Addsum web site and general info

Postings here will focus mainly on Advanced Accounting software updates, tips, and related topics. They will also include general comments relating to troubleshooting PC/Windows/network problems and may also include reference to our other software products and projects including any of our various utilities, or to the TAS Premier programming language. We considered setting up separate blogs for different topics so that users/others could subscribe to topics mostly aligned with their interests, but decided that it would be better to keep things simple since some topics cross over into others. We would nonetheless welcome your feedback/input in this regard. Our web site URL is www.addsuminc.com. Call us at 800-648-6258 or 801-277-9240. We also maintain www.advancedaccounting.us so that older Business Tools users in particular have a greater chance to find us. White list noreply@follow.it to ensure you receive notifications once you subscribe.

Tuesday, February 23, 2016

Extend the life of old applications with vDos

Extend the life of old applications with vDos: using vDos to run 16-bit programs 
in 64-bit environments

When attempting to run legacy programs such as versions of Advanced Accounting prior to version 6 (e.g. Advanced Accounting 3.0, 4.x, 5.0 and 5.1) under 64-bit operating systems, the following response can be expected:


Other than upgrading to a newer version of the software which is available, there are a few other solutions to this problem, most not terribly desirable.  One is to replace the existing PC with a 32-bit version of the same operating system (particularly if it is running Windows 7, 8 or 10).  That is an increasingly impractical option.  Another is to install a virtual 32-bit environment or emulator.  Typically these are fraught with a variety of technical hurdles and are still somewhat awkward to access.

Another solution is vDos.


Advanced Accounting 5.1 (DOS mode) running under Win 7 Professional 64-bit
(FRAME set to OFF - recommend to be ON however)


Background:

While most of our users either have migrated (or will soon will be) to newer Advanced Accounting versions, it can still be desirable to be able to run old programs even if they will not be getting used on a regular basis. In addition, if an older PC fails when the older version was still being routinely run, and the old software is then of necessity migrated to a 64-bit system, the old software may still needs to initially be run in order for the conversion of data from 5.1 to 7i (and soon 8) to take place, plus it may be needed to be used until that can occur.  Programmers may also have an occasional need to look at older programs in the TAS 5.1 (or prior) application development system and be able to make program changes and compile older programs from a 64-bit PC.

vDos potentially provides a solution for all of the scenarios above. It could even be used for users who would rather fight than switch, the only primary potential problem then would relate to printing. vDos however provides ample support for printing and in fact provides legacy versions with a Windows dialog box that older versions lacked.* The printing options in fact appear to be very powerful including being able to print to a PDF, but would likely require changes to individual programs in order for the output to be properly aligned and formatted correctly in general.

(*Other than the tp5win.exe mode of version 5.1.  Tp5win.exe, while 16-bit, requires a Windows installation and therefore cannot be run under vDos.)

vDos was originally provided on SourceForge and made available as freeware until recently.  Older/freeware versions as well as community support remains there:

https://sourceforge.net/projects/vdos/

General information from the publisher about the product is here:

https://www.vdos.info/index.html

The April 2015 version (the October 2015 version has a built-in expiration date) remains available for free. Starting November 1, 2015, the latest version which should be registered but can be downloaded installed without advance payment (and which is no longer 100% open source, an irrelevant  fact for most users).

https://www.vdos.info/download.html


Installing and using with older versions of Advanced Accounting:

Initial setup:  Installing vDos initially is simple. The default install folder is C:\vDos. It normally should be installed to a local drive even if the accounting (or other legacy) software is installed on a networked drive, at least for preliminary setup and testing. 
   
Folder names and any called file names should be 8.3 compliant. The location of the existing legacy software should already be in a compliant folder name. If located across a network, the user will need the normal read/write/delete rights to the folder.

The vDos software uses the C++ dynamic library link file MSVC100.DLL. If you receive a message indicating that DLL is missing, you will need to download  and install the Microsoft Visual C++ 2010 Redistributable Package currently available here:

http://www.microsoft.com/en-us/download/details.aspx?id=5555

At this point, you should be able to run the vDos software which by default calls an old DataPerfect application as a test.  Assuming that runs successfully (press F7 to exit out of that software and type the word EXIT and then press ENTER to exit the session), proceed with next section.

Configuring to run Advanced Accounting:  The vDos.exe (executable) creates its own C:\ environment or session, and relies on two files that are initially installed in the same folder as the executable, CONFIG.TXT and AUTOEXEC.TXT.  These correspond to the days when CONFIG.SYS and AUTOEXEC.BAT were in the C:\ drive of MS-DOS systems as well as early MS-Windows systems (in later versions of Windows, they were placed in C:\WINDOWS\SYSTEM32 and renamed CONFIG.NT and AUTOEXEC.NT).   The shortcut to vDos.exe will automatically process whatever is in the CONFIG.TXT file and call the program specified in AUTOEXEC.TXT as if it was a batch file.  While initially that is the most simplistic installation approach, in a multi-user environment or if you will be using vDos.exe to support more than one legacy application from the same desktop, a different and better approach would be to copy the CONFIG.TXT and the AUTOEXEC.TXT to the legacy application's folder, and then in the icon's properties, change the "Start in" folder to match that location.

Nothing needs to be added or changed to CONFIG.TXT (except see the recommended change below).  CONFIG.SYS and CONFIG.NT in the older days required a FILES=150 (typically defaulted by Microsoft as FILES=40).  vDos however does not require any FILES= statement because it is already equipped to handle a high enough number of global file handles. If you intend to print out of the legacy application, you will need to review the CONFIG.TXT to tell it how to handle printer redirection for LPT1, LPT2 and LPT3.  There are some other optional settings that can be made.  A setting in CONFIG.TXT that we would highly recommend enabling is:

FRAME = ON

Just remove the REM prior to that line in CONFIG.TXT.  Not only does this provide a standard border around the application window and therefore provides for standard window navigation, it also makes the screen behave in a more expected fashion should you attempt to move the title bar/window around with your mouse.   Without enabling FRAME=ON, the window wants to move down on the screen to the point where it becomes unusable (at least when accessed remotely).

If you are configuring vDos to run Adv 5.0 or 5.1 (but not earlier versions) or TAS 5.0 or 5.1, it is essential that you turn off the dosg4 handling.  These versions of Advanced Accounting and TAS include the setting file:

tpc50.ini

which resides in the same folder where the version 5.0 or 5.1 software is located (i.e. wherever tpc50.exe and dos4g.exe are located).

Use notepad or some other line editor to change the default from:

[dos4g-vm]
On=TRUE
etc. 

to

[dos4g-vm]
On=FALSE

and save.  When run under Windows on 32-bit PC's, Windows ignores the DOS 4G extended memory manager and uses its own memory handling, but if the dosg4g-vm section "On" key is not turned off by setting it to false as above, vDos will not be able to load the program and will return the error:

Page fault directory or table entry not present  

Next edit the AUTOEXEC.TXT file to replace the reference to the demo/test application with calls to run Advanced Accounting. vDos has a USE command that allows you to do something somewhat similar to a NET USE which is handy even if the application is stored on the local drive and not across a network.  Keep in mind that you have to move to the application relative to the C:\ session environment you will be in once vDos.exe is called. UNC paths are not normally used with legacy applications, but the vDos USE option allows you to use them in its supported USE statement.   So where servername is the Windows server or PC name where the program is installed and adv51 is the name of folder that the program is physically installed under, you might assign drive Z: (which does not have to match physical drive mappings, but is preferable) as follows in the AUTOEXEC.TXT file.

use z: \\servername\adv51

Then you would "move" to the z: drive setup after making the USE above by adding this to the next line, just like you would in a batch file:

z:

If needed, you could include "change directory" commands to move to a folder if the USE statement referred to a folder above where the software was installed, e.g.

use z: \\servername\shared
cd adv51

Note:  while not required, it is best to use the same drive letter as any existing drive map to the same folder, or to at least not use conflicting drive letters to avoid not only confusing Windows but also yourself and anyone else who is responsible for maintaining the system at a later date.   Put comments in the TXT file to explain what was done, and why.

Next use the CALL statement to either call the normal Advanced Accounting batch file or the related executable directly as outlined below.

Remove or place a REM in front of the test program:

rem CALL DPTEST\STARTDP 

and replace with:

call adv.bat

Before using adv.bat, review it in a text editor such as notepad to determine whether it has been modified to change directories or call something that should not be called in this simulated environment.  Instead of adv.bat, you could instead:

call tpc50.exe bkmenu

You could also establish SET TAS50= or PATH= values as needed.  To avoid having to type EXIT to return to the desktop, simply remove the rem before the word EXIT at the end of the AUTOEXEC.TXT file.

There is one additional property that we have found needs to be made and one that is commonly made with legacy programs:  right click on the vDos desktop icon, choose Properties, click on Advanced, click on the "Run as administrator" option to check it if not already checked, then click on the OK button and then OK again.

If you receive a:

TAS50.OVL could not be found in your default path 

it will relate to the "run as administrator" icon property above which will likely be needed even if you are logged in as administrator to the local PC.

Click on Advanced to enable Run as administrator option
The "Start in" can/should be changed to match the
location of the CONFIG.TXT and AUTOEXEC.TXT
files that tell vDos what application to run.


Conclusions:

vDos is an excellent product that we would recommend especially to bridge the gap in situations involving PC migration as well as for archival reference.  Unlike in some simulated environments, all screens and screen characters appear normally and all of the important keystroke combinations that Advanced Accounting uses (function keys, ESC, Home, End, Page Up, Page Down, booster key combinations such Alt-1, Alt-F1, Ctrl-Page Down, etc.) all appear to be properly supported.  vDos documentation claims to be capable of full multi-user access and so could be used to support live production environments (which we have not tested).  Running from across a network, it may be a little more sluggish than running from a 32-bit PC directly, but not unacceptably slow.  vDos supports some interesting printing enhancements although it may be possible to fully reap the benefits of those without some reprogramming of existing Advanced Accounting 5.1 (or prior) report layouts and related code.  Using this as the sole solution for moving forward into the 64-bit world is probably not realistic in the long term for most users: upgrading to the newer versions of the accounting software would normally be the better long term option for Advanced Accounting users.  On balance, however, vDos is highly configurable and is seemingly a very valuable tool that could have many uses.


Advanced Accounting 5.1 (DOS mode) running locally on Windows Server 2012
(FRAME set to OFF in this example - recommend to be ON however) 

Note:  our preliminary succesful testing on two different systems (Win Pro 7 64-bit and Server 2012 64-bit) was solely with the Btrieve 5.10a TSR as distributed and provided by the original publisher of Advanced Accounting 5.1, TAS Professional 5.1, and predecessor products.   An attempt was made to use a Pervasive 11 workgroup engine on a third system, but that does not appear to be possible.  While modern Pervasive engines do provide "DOS Box" support, that support appears to be unavailable when using vDos, which is instead attempting to run the application in a largely different environment; it is largely not integrated with the Windows operating system and does not therefore support DEVICE= statements in its CONFIG.TXT file, etc. 


Monday, February 15, 2016

When Arial is missing

A long-time user contacted us today about migrating their Advanced Accounting 6.x system to a newer operating system on an also newly purchase computer.  They wondered whether the newer update that is available would fix a problem with both screen and printing having become excessively small and hard to read since making that change.

The "bitness" of the operating system of course had nothing to do with this issue; it was one we haven't seen before, but which many computer users have reported experiencing:  a missing Arial font installation.

The missing font of course also impacts the way that web sites are viewed in a browser.  For example, this is what our support page looked like from the end user PC:


This above is not what it normally looks like.

When the accounting software came up, the lower portion of the Advanced Accounting license screen appeared as follows:


Note the almost unreadable text starting with the Continue button and the rest of that screen.  Entry fields within the software were also very small and hard to read.

Because it is a standard font that is normally installed with all Windows installations, the most common font used in Advanced Accounting 6 and now 7i (and this will be true with the next release as well) is Arial (although it is not the only one).   When a font that is specified by an installed program is missing (including in web pages), the operating system attempts to find the closest available match, but the results can be unpredictable.

In checking installed fonts on this PC, there was no Arial.

After installing Microsoft's European Union Expansion Font Update which includes an updated version of Arial (along with Times New Roman, Trebuchet and Verdana), the problem was immediately solved, and without the need for a reboot.


Control Panel Fonts section after installation of MS font update (Windows 7 Pro)


Monday, January 18, 2016

More Advanced Accounting payroll updates

Some years are busier than others when it comes to payroll updates and features.   This year has been more hectic than usual.

Mainly this has been due to new features such as the new e-filing option (added towards the end of 2015 and for which testing was completed in early January of this year) and better support for reporting the cost of employer sponsored health plans (added in November of last year) rather than government mandated changes. 

To ease future updates, we have also made the calculation for the additional medicare tax open-ended into the future since it appears to be here to stay.  We've also added a new feature in the PR-F FUTA/SUTA history report to allow access to PR archives to include terminated employees in that particular option.  The PR-K option has been enhanced to allow for from/to wage bracket amounts in excess of $1,000,000 (necessary to fully and properly implement California tax tables, for example). The federal tables and the tables for California and several other states have also been updated.  Some states have posted no changes.

Oregon's complex existing logic has been updated to match January 1, 2016 required changes for that state (and our new e-filing capability is available to meet their paperless filing requirement for W-2's).  The internal required logic for Massachusetts has been updated including exemption amounts; standard exemption updates have also been made for Maine, Minnesota, New Mexico, New York, North Dakota and Vermont.  Users will also need to update PR-K state tax table changes in these and potentially other states.  Rhode Island's maximum wage limit has been updated but users will still need to update PR-K state tax code RIA (for example). More state changes will be made as they are identified.

Other programs providing for payroll capabilities often involve end user charges that on a monthly basis exceed the cost of an annual Advanced Accounting payroll update.  Our goal will be to continue to offer a feature-rich payroll module at a low cost of operation.    

More information 


Thursday, December 31, 2015

New federal-state e-filing payroll interface available for Advanced Accounting


A new federal and state e-filing interface has been added to Advanced Accounting 7i's payroll module that can be used to electronically file W-2 forms with both the IRS as well as in various states.

The trend towards paperless forms has been apparent for some time.  The threshold for filing state forms in many states continues to be lowered.  Some states (Connecticut, North Carolina, Oregon, Utah, and Virginia as of the date of this post) already do not accept the filing of paper W-2 forms, i.e. the threshold is zero. Minnesota has a threshold of just ten forms.   Six states have a requirement of either 25 or in one case 26, and another seven currently have a requirement of either 50 or 51.  These numbers will continue to drop, and states with state income tax withholding that currently have a high (or no) threshold will no doubt be implementing similar requirements in the near future.

While the IRS/SSA threshold is still 250, the IRS continues to strongly encourage e-filing to improve accuracy and timeliness and we would expect that number to be significantly lowered in the not too distant future.  States such as Utah have gone paperless under the philosophy that it is a safer mode of transmitting highly sensitive information.   Many end users are increasingly wanting to file their SSA copies electronically for this same reason.

Further, the complexity and ever-changing nature of these requirements both federally and on a state-to-state basis indicated that a better overall solution was needed for Advanced Accounting users.

A federal filing format option has long existed in the software and one that we have regularly updated over the years.  Originally it was referred to as the 'W-2 Electronic/Mag Media Filing" option.  We first started making significant updates to this option going back to at least as early as July of 1997.  That program was originally using the MMREF-1 format.  In tax years starting in 2007, the MMREF started to be referred to as the EFW2 format, which we continued to support through the end of 2014.

But the complications of that rather esoteric format coupled with increasing additions and requirements have made it difficult to make it a full solution even for federal-only e-filers. Further, states typically have their own separate requirements that the prior option could not satisfy.

So, in mid-December of 2014, we entered into some preliminary agreements with Nelco Solutions.  An actual interface however has not been available until now, and we are in the process of submitting test cases to validate the results (postscript: 2015 acceptance testing was completed on January 6, 2016).   We therefore anticipate that the interface will be available to users for 2015 filings, and it is being included in year end payroll updates.

Nelco specializes in W-2 and related e-filings and is an organization we have kept in touch with for well over a decade now in terms of potentially working together to come up with an effective solution for end users.   New capabilities and options will no doubt be made available to our payroll users and their employees as we go forward as a result of this collaboration.

Further, this option simply supplements the existing payroll module and in no way replaces it.

There are typically small fees associated with submitting these filings through the interface.  We believe that users will find these fees very reasonable particularly given not only the convenience and complexity involved but also in meeting applicable federal and state requirement. 

A quick overview of the new option and import process follows:


New PR-G option:


Answer "Y" to the export file option.  Then simply continue to process W-2's including a W-3 if desired.  This includes editing informational boxes as already provided in the software.   Prior to editing that information, however, when choosing the export file option, a new screen will appear asking for verification of the submitting company name, address, phone and e-mail.  In addition, you will be asked for the folder and file name of the export file. 


The file name can have any desired extension (a CSV extension is recommended).  If the directory does not exist, the program can optionally create it.   If the file name selected exists, you will receive a warning message and will be asked if you want to overwrite (normally you would not select an existing file).  

Click on proceed to continue and then proceed to process W-2's and optionally a W-3 as normal.  At the end of the normal process and after having chosen the export file option, you will then see a (new) launch portal screen from within the software.   This screen will also repeat the full path of the file name which we suggest you either copy and paste and/or make a handwritten note.  


Before clicking anywhere on the panel in the left corner of this screen, you can if desired retrieve the CSV in a spreadsheet program for review.  Normally you would not want to make any changes to the CSV file unless there is an unusual situation involving an error that needs to be corrected prior to submission.  The file otherwise must remain in the exact same format and delimited the same way.  The CSV file naturally contains confidential employee information which should be safeguarded and not made available to others.   We suggest retaining a copy of the file however at least until the process is completed and you receive acknowledgment of your filing request.   Submitting the file through the portal however is safe.

After launching the web portal (which you can also launch simply by copying and pasting the link provided under the clickable panel, and go to:

https://addsum.nelcoportal.com/import/gwximport


The PR-R-C option now also shows this same screen (but without the import file box) simply to provide a way to reference the portal's web site if follow-up or other action is needed, but not because the import is otherwise initiated here, as it formerly optionally was (this is is where the older EFW2 export option existed which has now been retired).

After launching the portal, either create a new account when logging in for the first time or log in with your previously established credentials. Then at the data import screen, import the same file that was created above within the accounting software (click on the Choose file option, and select the import file).


After clicking on import, unless problems were detected in the upload, you will select your filing options.  If you will only be filing federally, be sure to click on the "federal e-filing" check box.   


If wages are submitted for a state that has an e-filing option, a "State E-filing" check box option and an additional column next to each employee will appear. You can choose to file federal and state via the "a la carte services" section, or you can choose the "full" service (bundles) that also includes Nelco actually printing the employee copies and providing employees with e-mail address to the filings (requires the input of each employee's e-mail address; in a future Adv release we will be providing a more automated way to accomplish that).   So using the full/bundled service allows users to not even have to purchase W-2 forms and saves the time involved in both printing them as well as providing them to employees.

Make sure that the appropriate options are reflected on this screen.   Click on Next to review and submit your forms.


After clicking on Next from the submit forms, you simply enter your payment/card information and the process is complete.


More information:
Paperless Filing flyer (2015)

Additional operational and technical details:


If a problem is detected at the web portal import stage, those errors will be outlined as which point you can return to the import page to try again after correcting the errors (contact us 1-801-277-9240 or e-mail us at support@addsuminc.com to resolve any problems in this regard).

When filing in a given state, any required form that is required by that state will appear as part of the submission process with as many boxes already completed as possible based on the data imported.

(Postscript:  the information below about IE and Silverlight no longer applies starting in 2016)

While to initially submit and import data any of the major browsers seem to work without problems, Nelco recommends the use Internet Explorer.   When making state filings and a form has to be completed, the web portal may inform you that you need to use Internet Explorer with the free Silverlight plug-in.   This does not create any additional work should this happen since any imported data will still remain pending.  Switch to an IE browser with the Silverlight plug-in installed and log back into the portal and proceed to manage your account where you will be able to proceed with completing your submission.

In all it is an efficient and economic solution to federal and state e-filings.


Tuesday, December 15, 2015

Adapters and binders and provider order priority may cause chaos

Recently two of our accounting software users have reported problems that correspond to whether their PC's wireless Internet connectivity is enabled or not.   In one case, a Windows 7 Pro PC connected to Advanced Accounting across a network "stops working" when connected wirelessly for Internet access (normally the PC is without Internet access).  In another case (operating system unknown, probably Windows 7) , the software installed on the local drive and not networked operates as expected when the PC is wirelessly connected to the Internet, but the user experiences "run program not found" types of error messages when that connectivity is disabled.

Locally installed programs (on-premises software in today's jargon) usually do not care whether Internet connectivity is available or not, much less whether it is wired or wireless and that is certainly the case with Advanced Accounting.

Network adapter and binders priority and/or provider order settings that have been changed by other program installations may be responsible for these problems.

Microsoft has a tendency to to put wireless connections at a priority with newer PC operating systems.   Also certain programs may install themselves as having priority potentially creating  slowness.

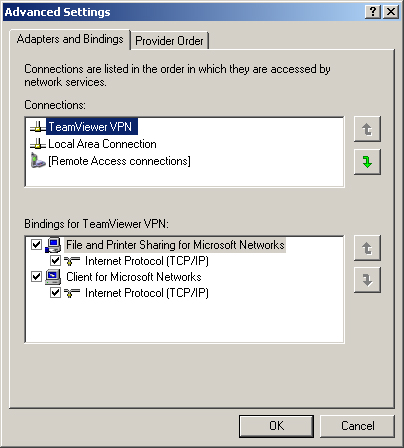
We note for example that the Teamviewer VPN likes to insert itself as first priority under Adapters and Settings.  This was a result of its installation and not because we placed it there:


TeamViewer VPN made itself first priority.  Even if we used it very often (we don't),
it would still be advisable to move Local Area Connection by highlighting it and then 

using the arrows at right to instead make it the first priority.

If you have wireless connections set before your local wired network, move your wired network above them.  Wired networks are always faster (and safer) and so if you have one, make it the priority.


Even Microsoft Terminal Services puts itself as the first network provider:
Move Microsoft Windows Network to the top by highlighting it and 
then using the arrow buttons at right.

Whether these changed priority settings would lead to local software not loading at all would be unexpected, however, it is known that bad or corrupt settings can lead to drive mapping failures including errors such as "Network path cannot be found."

Some examples:

http://www.tpateman.co.uk/reboot/unable-to-access-unc-paths-and-map-drives/

http://weblog.west-wind.com/posts/2013/Apr/04/UNC-Drive-Mapping-Failures-Network-name-cannot-be-found


To review and potentially change the order of Adapters and Bindings as well as your Provider Order, see below.


XP Pro:


On the desktop, right-click My Network Places, and then click Properties.

On the Advanced menu, click Advanced Settings.

On the Provider Order tab, in the Network Providers list, click Web Client Network.

Press DOWN ARROW so that Web Client Network is the last provider in the list, and then 
click OK.

Alternatively, you can change the network provider order in the registry. The registry 
entry is:

HKEY_LOCAL_MACHINE\SYSTEM\CurrentControlSet\Control\NetworkProvider\Order\ProviderOrder
The default value of this entry is RDPNP,LanmanWorkstation,WebClient.  

Above based on:
https://support.microsoft.com/en-us/kb/832161


Windows 7 including Win 2008 and 2008/R2:


See:

https://support.microsoft.com/en-us/kb/2526067

http://windows.microsoft.com/en-us/windows/change-network-protocol-bindings-order#1TC=windows-7

https://technet.microsoft.com/en-us/library/cc732472(v=ws.10).aspx


Windows 8/8.1:


www.laptopmag.com/articles/change-connection-priority-windows


Windows 10:

http://blogs.technet.com/b/networking/archive/2015/08/14/adjusting-the-network-protocol-bindings-in-windows-10.aspx


Make your local workstation and wired connections the first priority via these options, i.e. before  any wireless or other connections.  Occasionally re-check these settings.  If nothing else, your local network connectivity should be faster.

Thursday, November 12, 2015

W-2 reporting of employer-sponsored health coverage

Using Advanced Accounting's editable W-2 feature pertaining to boxes 10, 12, 13 or 14 first introduced in version 6 in 2007, the costs related to employer-sponsored health coverage can be easily input so that W-2 forms will contain this information as may be required.

While the requirement for this information went into effect in 2012, the IRS has provided transition relief for many businesses until "final guidance" is provided that still appears to be pending.  The current recommended course of action can be found hereIRS 2015 W2/W3 general instructions on the one hand indicate that reporting of these amounts is required, but then makes a somewhat circular reference to the Box 12 instructions which then refers one back to the recommended reporting guidelines and the reference to future guidance.

For those companies who either want to, or are required to, report the amounts, they are reported using code DD in Box 12 (a, b, c, or d). The amounts reported are not taxable to the recipient and are simply an information requirement (logically then Box 14 would have represented a more appropriate place for them, but that is not where they are reported). Unlike deferred compensation amounts included in Box 12 and carried over to box 12a on the W-3 form, code DD amounts are not reported on the W-3 transmittal form.

Previously anything entered in one of the four slots in Box 12 via Advanced Accounting's W-2 option were summed and included in the W-3 Box 12a total.  Starting in 2015, we have added programming logic to exclude any DD code amounts from being included in that total.   Other than this change (and adding some additional instructional language on the main screen of Advanced Accounting's PR-G option used to print W-2s as well as when presented with the "edit" question along with some screen changes to reference code DD on the pertinent input screen), the program remains the same.    

While we still support all versions of Advanced Accounting ever released, only the latest version (7i with latest updates, and soon version 8) will contain the changes described above.

So what are the steps for reporting this information?

(1) Give yourself enough time to tackle processing your W-2 forms even though it may not be particularly time consuming.  In this regard, take advantage of the "do it later" feature (i.e. under PR-G and then the option:   Clear employees/process W-2s later) which was first introduced in version 7i in early 2012;

(2)  Before proceeding to process your W-2 forms, accumulate information you may either be required to report, or that you may want to report, in the editable boxes.    Read through the latest W-2/W-3 instructions from the IRS and/or the instructions on the back of the W-2 forms paying particular attention to the editable boxes.  With respect to the cost of employer-sponsored health coverage, IRS instructions indicate that it should include both employer and employee paid amounts;

(3)  Nothing related to code DD is initially selected when tying employee deductions to IRS boxes, because the amount you might report under code DD will not likely correspond to those deductions.  Simply process as normal until you reach this question:


Answer:  Yes.

(4)  Next you will see a screen for each employee like this:


The highlighted Box 12 section is where you input the code DD and then to the right of that code, the cost amount for that employee.  It does not matter in which of the a,b,c, or d slots that you input the code and amount.  Further, you can input it in different places for different employees if you need to. (For simplicity however we would recommend using Box 12d for all DD amounts; or chose some other box that is the same for all; but again, this is not required.)  The program will include all amounts entered in Boxes 12 a,b,c, and d into the W-2 transmittal's Box 12a except it will now exclude any DD coded amounts.

(5) Simply continue to the next employee and process to completion as normal.


More information:
IRS Employer-Provided Health Coverage Informational Reporting Requirements: Questions and Answers

Sunday, November 1, 2015

XLS files: converting text to numbers


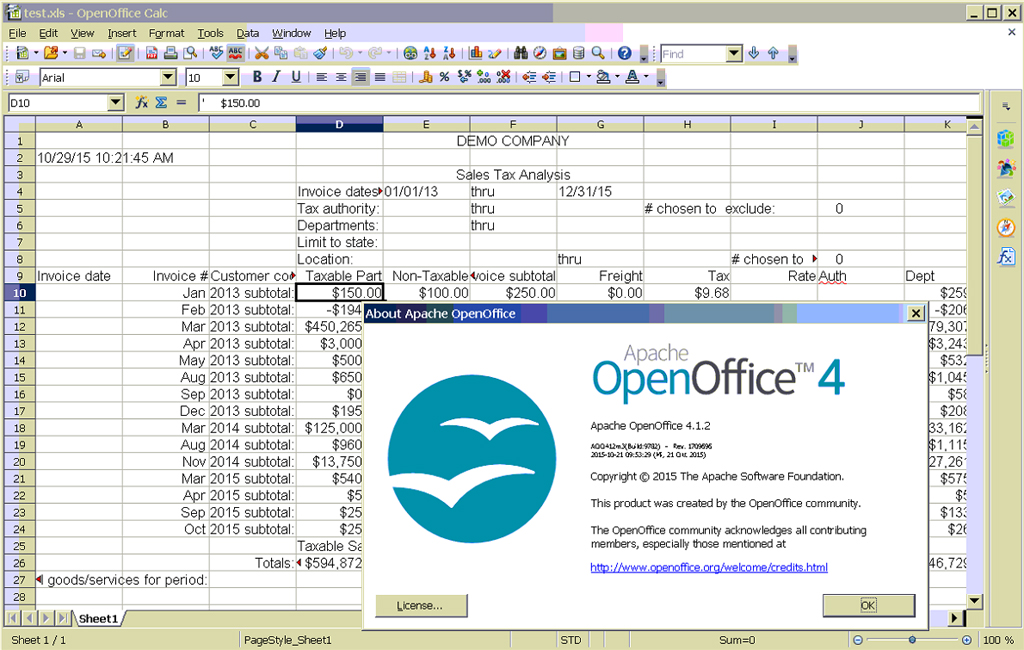
When retrieving an XLS file generated directly from the print to file option included in all Advanced Accounting versions from 6 through 7i (see printing to a file in Advanced Accounting) as well as upcoming release 8, numeric data may be initially formatted as "text" rather than as numbers.  In order to use the data in calculations, this text data can be easily converted from text to numbers via a few steps depending on the spreadsheet program that is used.  The discussion that follows outlines options available in OpenOffice Calc and Microsoft Excel to accomplish this task.

First, here's a preview of a sample report generated out of upcoming Advanced Accounting 8's enhanced sales tax analysis report grouping sales by month:


The discussion below involves retrieving the XLS file generated from this report and converting some of the columns to numbers.


OpenOffice Calc:

In OpenOffice, a leading apostrophe denotes text formatting.  


Rather then edit the cells individually, after retrieving the XLS file (click on File then Open and navigate to where the file was saved), first select and format all cells to numeric (not currency) with two decimal place precision.


Note:  a convenient way to select cells is to simply click on the first cell and then hold the SHIFT key and use down and ultimately right arrows.   Then click on Format then Cells to get the option above.

Without unselecting the cells, do a Find and Replace (click on Edit and then Find and Replace, or CTRL-F) .

Search for:

^. 

(i.e. input the caret or exponent symbol produced via Shift-6 followed by a period)


Replace with:

&

(i.e. an ampersand character, Shift-7)

Click on More options if the option list is not already expanded and make sure that "Regular expressions" is checked.

Click on Replace All, then Close.


All of the selected cells are now numeric.

The above procedure works in OpenOffice 2, 3 as well as the recently released 4.

Microsoft Excel:

There are many different versions of Excel, each of which may offer different approaches to accomplish this task.   A general reference document can be found here: How to convert text to numbers in Excel.

The "text to column" approach is one method (Method 7 in the link above), although it only works in selecting one column at a time and is not as convenient as in the OpenOffice Calc example.  Here is an example using Excel 2010 and this method.

Select one column of text that contains numbers.

Under the Data menu or tab, choose Text to Columns.

Choose Delimited, click on Next and choose Tab and again click on Next.


Choose General for the column data format.   Via the Advanced button, the decimal and separator options can be made, and then click Finish.   


Repeat for each column.