
The designer is intended to be used with program code that loads and provides the data pipeline to the report. While not intended to be a report writer, the report setup nonetheless to a significant degree also "drives" the report.
While the designer can be launched and used as an end user tool to edit RTM layouts if provided for programs running within TAS runtime environment (in order to make basic changes for example), changes must be made with care to avoid making edits that change group fields or named objects or that add subreports or use fields related to files that are not opened in the program that the RTM was originally intended for. Related fields may also not necessarily be available if added to the report depending on whether the underlying program code is making those related finds. Edits could easily be made that would then cause a given report not to function at all.
While the report designer is most often used to provide traditional reports, it can also be used to include images and to accomplish form emulation including "fill in the blank" type forms. And some objects can be used to emulate forms directly rather than via scanned images.
A brief discussion of the approach can be found here, which is further discussed below:
https://www.digital-metaphors.com/products/report_design/form_emulation.html
There are different considerations in the report design depending on whether the form you wish to emulate is a single page or whether there are multiple pages (like various federal payroll tax forms). It is also important to know whether or not there will be multiple records that need to be found in detail section within a single page.
Single page forms: the simplest approach is to put everything in a detail band that is sized to the height of the page, eliminating all other report sections. In this design, each record (or values accumulated into memory via temporary variables) is associated with a single form page.
If a variable number of records are required to complete the form, a different approach is required that involves use of a Page Style report band. A Page Style band is like a Title, Summary, Header, Detail or Footer band but was something not available in prior releases of TAS Professional and TAS Premier.
Starting with release 12 of TAS Premier 7i that will be made available later this year, a Page Style band will be supported in the report designer as shown below.
 |
| Page Style band in rel. 12 of TAS Premier 7i |
Multi-page: similar considerations apply except that with multi-page forms, the page height bands, whether Detail or Page Style, each page needs to be separated into subreports. The main layout page might have nothing more than a detail band with two or more subreports each of which might print a full height page. Driving the report, in the simplest approach, just one record (or a single set of memory variables), might trigger the printing of both pages.
For more details, see the detailed example at the end.
The possibilities for form emulation are almost endless.
Miscellaneous tips and comments:
Images: A compromise between image size and printer overhead might be taken into consideration, however, we have used fairly large scanned forms in the 4 to 8 meg range and have not seen much of a performance difference. The sharper the scan, the better the printer output quality. We have found that bitmap (BMP) image files work very well for most forms. Note that when using an image to take up basically the entire height/width of a page, it is best to first apply these properties to the image object:
Uncheck Center
Check MaintainAspectRatio
Check Stretch
Next place the TppImage object in the upper left hand corner of the Detail or Page Style band you will be using. Then with your mouse, pull the image down to the bottom of the band and then to the right.
To optimally size the image, you may use digital editing software tools before bringing it into an RTM. For form emulation, you will want to use a TppImage (see Image object below) rather than a TppDBImage (not shown below).

Forcing regions to fall behind Shape and Line objects requires a few steps. It is important to first uncheck the On Print Control Flag. (Normally regions need "on print" control so it depends on what you are trying to accomplish.) For a blank area on the form that will not be populated with any field values, turn it off or else it will not appear on the report output. Also:
Blank out the default Caption name
Under Brush then Color choose a light gray color or create your own grayscale or other color
Under Pen, in the Style drop down, choose the "blank" (empty) style which is the sixth item down.
 |
| Region properties |
| Gray region example |
Right click on the region and choose Send to Back
Next choose (with a mouse left click) the Shape object and then right click on the same object and choose Send to Front, and finally right click again and choose Send to Back
The region will now be "behind" the Shape object as shown below:
 |
| Manually created form using Shape, Line, Region and Label objects. The six regions above are all behind the shape and line objects. |
Report previews: when viewing the report in a preview, included image quality isn't the same as when the document is printed to a printer (or to a PDF) due to the way that images are rendered to the screen. Don't worry if the report form doesn't look as sharp in the preview as expected.
Multi-page example
 |
| Two subreports on the main report designer page/tab with a detail band only. Add additional subreports if your form is more than two pages long. |
 |
| The detail band of the main report page should be set to a dynamic print height. |
 |
| Since the main report page is considered to be tag 1 by default, the first subreport is tag 2. The tags are important and are referred to in program code. |
 |
| The second report is tag 3 and also, note that subreport 2 must shift relative to the first subreport (otherwise it would print on top of the first subreport). So, the ShiftRelative Property for the second subreport is a critical property. |
 |
| Clicking on the first subreport tab. The subreport for a form only would have only a detail band (or instead only a Page Style band). |
 | ||
| Assuming a full page form, set the print height to be static and the height to take up the entire page. The height indicated is assuming a 0.5" bottom margin and 0.25" top margin so the subreport height is set to 10.25". |
 |
| Clicking on the second subreport tab. It too would only have a detail band. |
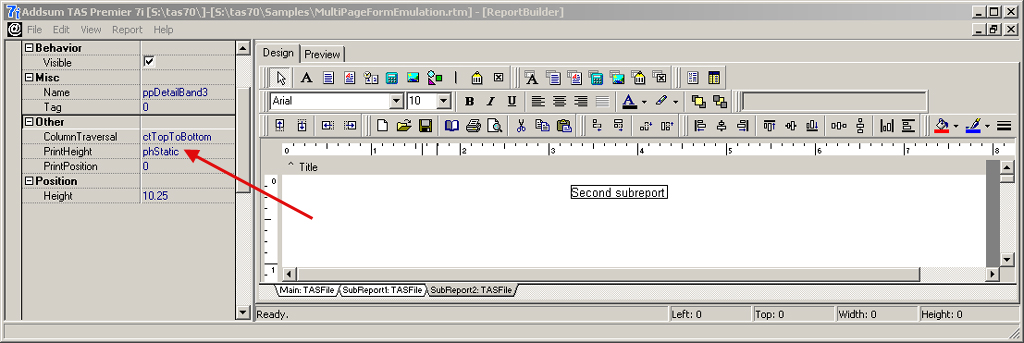 |
| As with the first subreport, set the print height to be static and the overall height to take up the full size of the page. |
The TAS program code (placed in the Program editor and compiled) to generate the example above might look something like this (note how little code is required to setup and output the report and generate a print preview):
Note this is a simplistic example with no selection screen - normally there would be a #winform compiler directive followed by the screen name at the top of the program.
#forcerwn
#winreport MultiPageFormEmulation
//define fields and open files which is this example
//would have to occur in the implied start label
start:
setup_report_buff rb_num 1 reportname 'MultiPageFormEmulation'
setup_report_buff rb_num 2 link_to 1
setup_report_buff rb_num 3 link_to 1
output_report_data rb_num 1
//now setup typically a SCAN data structure with desired logic
//to provide whatever data is desired to appear on the forms
//scan structure
//rb_num 2 corresponds to the subreport1 tag
output_report_data rb_num 2 //rb_num 3 corresponds to the subreport2 tag
output_report_data rb_num 3
//ends
//output the report
print_report use_printer
quit
ret